
Recently I have been obsessed with Go Programming Language (Golang) from Google. It’s such a lovely tool for any programmers that want simplicity of Python but a raw power of a compiled C program. Also, let’s add put it on steroid with a native concurrency support. This is the power of Go.
Since you can easily just learn how to do the “Hello World” programming in Go yourself, I’m going to introduce something that would normally be difficult to do using other language and platform. I’ll demonstrate how to build a simple web server to hand various request in the address to toggle the LED on, off, and blink on an Arduino Nano board hooked up to the web server computer. I’ll be working with Windows version of Go. Some minor change can be made to use the code in Linux.
The first thing to do is install Arduino IDE if you don’t already have one on your computer. I’m running version 1.8.1 which is the latest one as of this writing. You’ll also need an Arduino Nano if you want to follow this example exactly. Otherwise, any Arduino board should work as long as it can be programmend with Firmata protocol and you know which pin is the LED pin. If you want to support Arduino, you can buy the genuine version from many electronics vendor like Mouser here in the US for just under $30. Arduino Nano could also be cheaply purchased on Ebay for under $5 with free shipping. The reason why it’s so cheap on Ebay is because most of the components are probably fake. If you don’t want to run into problems with FTDI bricking your cheap Arduino Nano, I’d suggest getting the version that uses CH340 as the serial to USB IC.

The Nano needs to be flashed with Firmata protocol. This can be easily done via Arduino IDE.
Connecting to Arduino Nano using Arduino IDE
Launch Arduino IDE and then go to Tools -> Board. Select Arduino Nano or whatever board you are using from the list.
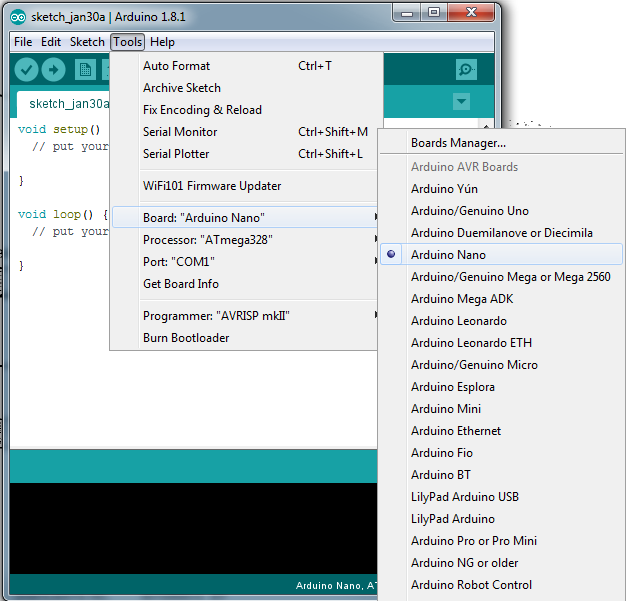
Pick the correct processor for your Nano board. In most cases, it’s ATMega328. If you are not sure just look at the chip on the Nano. For the one I have it says MEGA328P on it.

Now select the proper COM port where your Nano is connected. In my case, it’s COM8. After this is done, the next thing to do is load Firmata protocol into our Arduino Nano.
Uploading Firmata Protocol to Arduino Nano
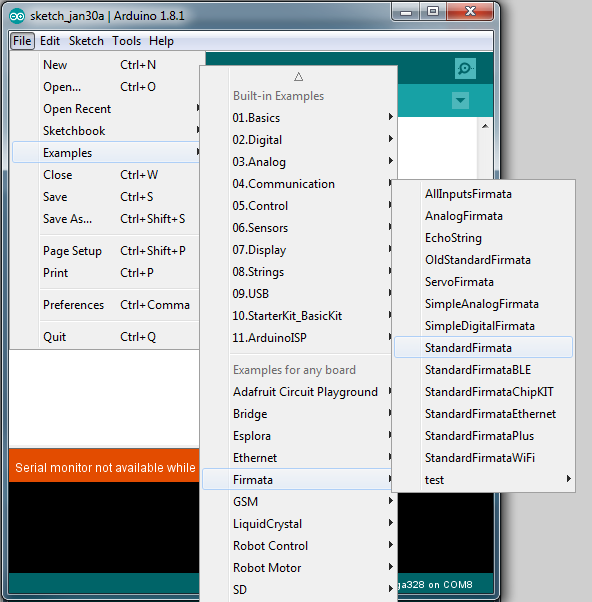
We can load Firmata example into our Sketch window by going to File -> Examples -> Firmata -> StandardFirmata
Now you should see a pretty long sketch for StandardFirmata. You can read through the codes if you are interested. Several of people put their time and effort into making this available for free. I love open-sourced community. Anyway, check the lower right bottom of Arduino IDE to see whether you have the correct connection information to your Nano. Click on the right arrow button on the top menu to program the firmware into your Arduino Nano.

If everything works, then you should see “Done uploading.” message. Now your Nano is ready to be controlled by Go Webserver. Close out Arduino IDE or you’ll prevent COM port on the Nano from being accessible.
I’m not going to cover Go installation in this post, but it might be a topic for a future post since I have already made some slides for work on how to install and use Go. I’ll have to transfer the content here for public use. I’ll assume that you already have Go ready to use on your system. I use LiteIDE as my preferred Go Programming IDE. It’s very stable and has all the features a paid program like WebStorm has.
Gobot.io Package Installation
We require the use of gobot.io library to interface with Arduino Nano. To install go bot, in command prompt, type in this command
$ go get -d -u gobot.io/x/gobot/...
It’ll look like your command prompt stopped responding, but give it a minute to finish the installation. Once it’s done, you’ll see a new command prompt line.
Go Programming Web Server Example
Before we start playing with the Nano, let’s run the webserver example provided by Golang. This code will create a web server on your local machine listening to port 8080. Anything you type (web safe string) after / symbol will be shown in the greeting string.
package main

import (
    "fmt"
    "net/http"
)

func handler(w http.ResponseWriter, r *http.Request) {
    fmt.Fprintf(w, "Hi there, I love %s!", r.URL.Path[1:])
}

func main() {
    http.HandleFunc("/", handler)
    http.ListenAndServe(":8080", nil)
}
Gobot.io LED Toggling Example
Now let’s do the example provided by Gobot.io to toggle our LED on using their example code.
First you just have to make sure to import the gobot libraries in your Go code. For our example, we’ll only need to use the GPIO and FIRMATA libraries.
import (
	"gobot.io/x/gobot/drivers/gpio"
	"gobot.io/x/gobot/platforms/firmata"
)
Here’s the example LED toggling code from gobot.io. There were a couple of examples, but I found that the firmata_blink_metal code gives you the most direct control of the hardware.
package main

import (
        "time"

        "gobot.io/x/gobot/drivers/gpio"
        "gobot.io/x/gobot/platforms/firmata"
)

// Example of a simple led toggle without the initialization of
// the entire gobot framework.
// This might be useful if you want to use gobot as another
// golang library to interact with sensors and other devices.
func main() {
        f := firmata.NewAdaptor("/dev/ttyACM0")
        f.Connect()

        led := gpio.NewLedDriver(f, "13")
        led.Start()

        for {
                led.Toggle()
                time.Sleep(1000 * time.Millisecond)
        }
}
This won’t work right off the bat if you are running a Windows Go on a Windows machine as I do. The reference to COM port has to changed to “COM8” for my Nano to get it to work. The LED pin is 13 on the Nano so that doesn’t need to change.
f := firmata.NewAdaptor("COM8")
You should be able to play around with this code to toggle your led on and off using other commands like led.On() and led.Off()
Merging the Codes Together
Now the hard part is trying to merge the 2 examples together. This is not as straight forward as I initially thought since I didn’t want to re-open the COM port every time a new command is sent because there’ll be a delay and the Nano seems to reboot every time you reconnect to the COM port. To prevent that from happening, I need to be able to open the COM port at the beginning of the program and then just pass the reference to the COM port to the http handler. I didn’t know how I could even do that since I’m still new in using Go and there wasn’t any good examples on Gobot on how to do things outside the main function. It took me a while to figure out how to solve this sending the firmata.Adaptor object to the http handler issue. After doing some web searches, I came across this post that suggested using closure to pass the parameter to the http handler. The answer was passing a string, but I figure that maybe you could pass the pointer reference to the firmata.Adaptor like this:
func handler(w http.ResponseWriter, r *http.Request, f *firmata.Adaptor)
Amazingly, it worked! So after initiating the COM port and assign it the variable f, I can now pass it to the http handler using the closure technique.
	f := firmata.NewAdaptor("COM8")  //for Linux use ("/dev/ttyACM0")
	f.Connect()

	led := gpio.NewLedDriver(f, "13")
	led.Start()
	led.Off()

	http.HandleFunc("/", func(w http.ResponseWriter, r *http.Request) {
		handler(w, r, f)
	})
Here’s the complete Go code.
package main
import (
     "fmt"
     "net/http"
     "strings"
     "time"

"gobot.io/x/gobot/drivers/gpio"
"gobot.io/x/gobot/platforms/firmata"
)

func handler(w http.ResponseWriter, r *http.Request, f *firmata.Adaptor) {

     text := r.URL.Path[1:]
     text = strings.TrimSpace(strings.ToUpper(text))
     led := gpio.NewLedDriver(f, "13")
     command := "UNKNOWN"

     if text == "LED_ON" {
          command = "turning LED ON."
          led.On()
     } else if text == "LED_OFF" {
          command = "turning LED OFF."
          led.Off()
     } else if text == "LED_TOGGLE" {
          command = "toggling LED."
          for i := 0; i < 10; i++ {
               led.On()
               time.Sleep(time.Millisecond * 250)
               led.Off()
               time.Sleep(time.Millisecond * 250)
          }
     } else if text == "EXIT" {
          command = "suggesting that you just close the browser window to exit."
     } else {
          command = "confused about what you want. Please send a new command."
     }
     fmt.Fprintf(w, "Nano is %s", command)
}

func main() {
     f := firmata.NewAdaptor("COM8") //for Linux use ("/dev/ttyACM0")
     f.Connect()

     led := gpio.NewLedDriver(f, "13")
     led.Start()
     led.Off()

     http.HandleFunc("/", func(w http.ResponseWriter, r *http.Request) {
          handler(w, r, f)
     })
     http.ListenAndServe(":8080", nil)
}
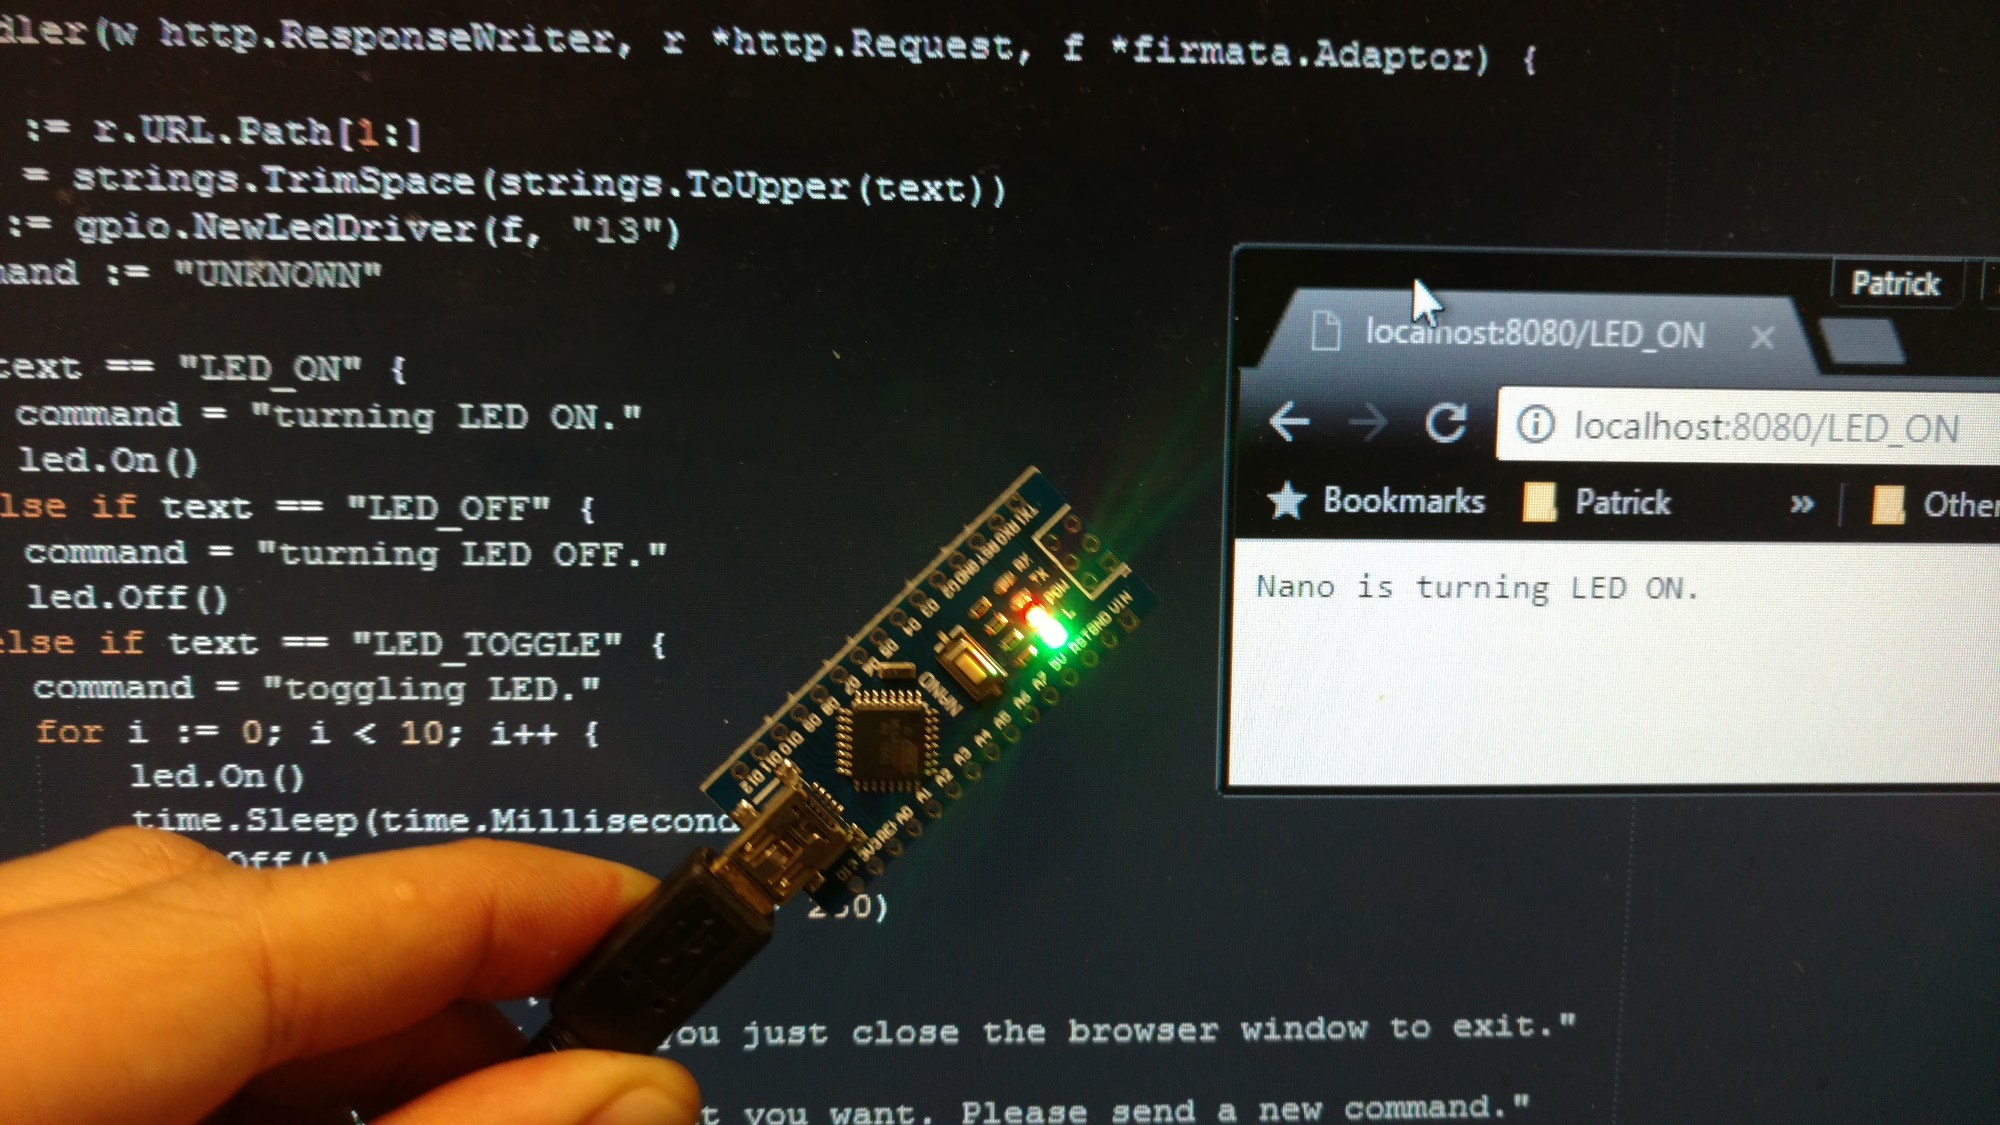
Now you can go to the web server and type
localhost:8080/LED_ON to turn on the LED
localhost:8080/LED_OFF to turn off the LED
localhost:8080/LED_Toggle to make the LED blink 10 times
Any other command, the message will just complain about not understanding your command.
That’s it! I hope you enjoyed Go Programming and Arduino Hardware interfacing in this quick example. There are many possibilities that you can expand this code to do more interesting stuff. I’ll also play with ESP8266 so that we can do some cool wireless IoT with Go.