I’m currently learning how to make games in GoDot 4.x and it’s been great so far and I even have the first tutorial game working on my PC computer.

This is great and all, but I want to share my game with other people. The first thought is to export it to HTML5 so I can just run it on my website hosted here by ICDSoft. My webhost is just an Apache based host running Linux of some sort. They do provide several cool server side stuff like php, mySQL, etc. However, the server plan I have doesn’t do node.js and things like that would allow me to run React framework. (They do have a Web App plan that lets you do that). Anyway, GoDot 4.x game export to HTML5 shouldn’t really need that. Exporting my game to a runnable web format is pretty straight forward in GoDot 4.x. Just go to Projects -> Export …

If you haven’t chosen any export presets, just click Add… at the top and then choose Web. This will create the presets you need to export to the web.

The only thing you really need to fill out is where you want the export path to be. I just have it export to a “Web” folder inside my project to keep things clean since several files will be generated by the export. Make sure that you toggle the Runnable to enable so that the game is runnable from the html file you chose.
Click Export All … to start the process.

If you go to the export folder you chose, you’ll se a bunch of files needed for your web output to run. Note that the html file just won’t run on your Chrome or FireFox browser locally without a webserver of some sort.
There are many guides on how to spin up a local server to run your GoDot 4.x project like this one:
https://github.com/TechnoLukas/Godot4-html-localy
or a nice an simple Python3 server like this one:
https://gist.github.com/opyate/6e5fcabc6f41474d248613c027373856
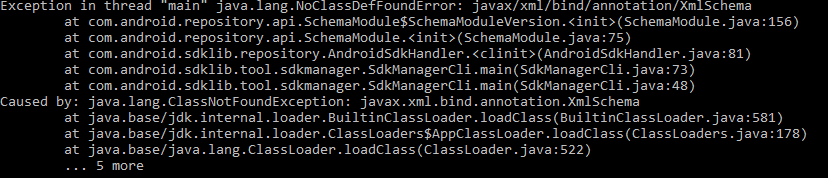
However, I don’t need a local server running since I already have my web host. Unfortunately, it’s actually not that simple due to this particular error when trying to run the game on my website after uploading all the exported files.

My initial thought was that maybe I can’t just run it on my web host but that’s a bit disappointing since I didn’t have problems running games made with Unity on the web. It’s a bit disappointing. I’m using GoDot 4.0.2 to be compatible with the tutorials I’m following. At the time of this post, GoDot 4.2 is the latest but it sounds like this is still an issue if your web server doesn’t have Cross Origin Isolation configured. I did a lot of web searches but there wasn’t a lot of solutions other than posting my game on itch.io.
I started reading through the GoDot help (https://docs.godotengine.org/en/stable/tutorials/export/exporting_for_web.html#) to see whether there are anything that could help me solve this problem. I came across this section about coi-serviceworker as a workaround. That could be the answer!

The link took me to a GitHub project: https://github.com/gzuidhof/coi-serviceworker and the instruction is pretty clear.
You have 2 options (pick one):
1) Download coi-serviceworker.js (6 kB)into your web export folder and add this line to your html file:
<script src="coi-serviceworker.js"></script>
2) Download coi-serviceworker.min.js (3 kB) in to your export folder and add this line to your html file:
<script src="coi-serviceworker.min.js"></script>
I tried option 2 to minimize the extra file size to include. I edited my speedy_saucer.html file and scroll to where the <script> section is and add the extra tag.

I saved the file and uploaded it along with the coi-serviceworker.min.js into my web project folder. Now I went to my website location where I uploaded the GoDot 4.x web export folder again and it worked!!!

Another way to include the script is to add it in the Head Include during the export. Make sure to have the correct corresponding coi-serviceworker js file in your project.

Maybe in the future update of GoDot 4.x this problem would be solved, but in the mean time the workaronud works great. Happy coding!